Stm32-Ethercat 主站开发日志
在此姑且用流水账的形式记录一下用 STM32 开发 Ethercat 主站时遇到的重重困难。
开发板硬件配置
开发板使用的是 STM32F407ZGT6.
网络模块 ETH
买的开发板的使用了 25MHz 的无源晶振作为 LAN8720A 的时钟输入,将 REF_CLK 配置为 Out Mode,即 REF_CLK 引脚为 50MHz 时钟的输出,将该引脚接到 STM32 上的对应引脚上即可同步二者的时钟。
电脑网络配置
在调试 LwIP 时使用电脑直接插网线到开发板上,开发板上加载了示例的 tcp_echo_server 程序,也就是开发板作为 tcp 协议的服务器,但是电脑的调试工具一直连不上,感到很奇怪。在不断检查代码然无果后,突然想到改一下电脑网卡的 IP 试试,改了之后果然就可以了。这可能是因为电脑用的是工位的固定 IP 地址,也不知道是不是这个原因。还是要再补充一点计算机网络的知识啊。
在这里顺便安利一下在微软应用商店找到的一个网络调试工具,叫做 TCPUDP网络调试助手,界面是用 WinUI3 编写的,非常现代简洁好看,很符合我的 xp
应用 FreeRTOS
在成功用电脑 ping 通板子后,开始学习 FreeRTOS 的使用,首先是在 CubeMX 中启动,并且在 SYS 中设置 Timebase, 这里就设为基本定时器 TIM6 吧,接着按照提示在 FreeRTOS 的 Advanced Settings 选项将 USE_NEWLIB_REENTRANT 设为 Enable,
因为这个应用应该比较简单,所以暂时就将 Memory Management scheme 设置为 heap_1, 即内存一旦分配就不再解除的模式。然后看了看芯片数据手册,是支持 FPU 的,所以把 ENABLE_FPU 也设置上。那差不多就可以保存一下,生成代码了。
在生成代码后记得改一下 ethernetif.c, 因为开发板用的不是 lan8742 而是 lan8720
在用 FreeRTOS 时遇到一个问题,程序会停在这个地方:
/* Look up the interrupt's priority. */
ucCurrentPriority = pcInterruptPriorityRegisters[ ulCurrentInterrupt ];

/* The following assertion will fail if a service routine (ISR) for
an interrupt that has been assigned a priority above
configMAX_SYSCALL_INTERRUPT_PRIORITY calls an ISR safe FreeRTOS API
function.  ISR safe FreeRTOS API functions must *only* be called
from interrupts that have been assigned a priority at or below
configMAX_SYSCALL_INTERRUPT_PRIORITY.

Numerically low interrupt priority numbers represent logically high
interrupt priorities, therefore the priority of the interrupt must
be set to a value equal to or numerically *higher* than
configMAX_SYSCALL_INTERRUPT_PRIORITY.

Interrupts that	use the FreeRTOS API must not be left at their
default priority of	zero as that is the highest possible priority,
which is guaranteed to be above configMAX_SYSCALL_INTERRUPT_PRIORITY,
and	therefore also guaranteed to be invalid.

FreeRTOS maintains separate thread and ISR API functions to ensure
interrupt entry is as fast and simple as possible.

The following links provide detailed information:
http://www.freertos.org/RTOS-Cortex-M3-M4.html
http://www.freertos.org/FAQHelp.html */
configASSERT( ucCurrentPriority >= ucMaxSysCallPriority );
按它的说法,就是系统中断的优先级不能设得比 configMAX_SYSCALL_INTERRUPT_PRIORITY 高(数值更低), 那让我试试把它改小吧。
好了,这个问题解决了,但是总是跳到 Hard_Fault_Handler() 。
于是上网找了找官方的LwIP示例,找了一通发现原来是 FreeRTOS 的 defaultThread 也就是 LwIP 的线程给的 Stack size 太小了,默认只有 128,但是官方给的是 512 * 4,差的也太多了。
仔细看了看 LwIP 模块有个配置项叫 DEFAULT_THREAD_STACKSIZE, 默认为 1024,可能是要比这个大吧。
姑且先改为 2048 吧,这样系统就正常运行了。
TCP/UDP with RTOS 测试
接着试一试示例里 TCPUDP with RTOS 的代码吧,直接把 tcpecho 的代码 copy 进来,在 main 中的 StartDefaultThread 里面初始化, 然后在电脑上发一个消息,结果是成功地返回了。
然后再试试 UDP, 同样地,把代码 copy 进来再做一些小修改,结果就跑不动了。
经过一番调试,最后是定位到这个 ASSERT 中:
/* A function that implements a task must not exit or attempt to return to
its caller as there is nothing to return to.  If a task wants to exit it
should instead call vTaskDelete( NULL ).

Artificially force an assert() to be triggered if configASSERT() is
defined, then stop here so application writers can catch the error. */
configASSERT( uxCriticalNesting == ~0UL );
他说线程中不应该有返回,但是我也没有返回啊,于是去问问 Kimi, 他给我翻译了一遍,然后说可能是栈空间不足,可以尝试增加任务的栈大小。
欸,貌似似曾相识的问题。于是去到 FreeRTOS 的配置中,增大了 TOTAL_HEAP_SIZE, 然后就可以了…… 还真是这个问题啊。
看来以后遇到奇怪的错误还是优先检查一下分配的栈空间够不够吧(或者直接一步到位分到最大值,但隐约感觉这样不太好)
顺带一提,现在的
TOTAL_HEAP_SIZE是 20480 Bytes(20KB), 之前的话是 15360 Bytes(15KB), 也就差了 5KB 嘛 (゚∀。), 这样一看还是增到原来的两倍得了,也就是 30720 Bytes, 反正最大支持 128KB 呢 ( ` ・´)
嗯……现在还有个奇怪的问题,就是复位之后如果在短时间内给板子发信息,就会出错,程序就不跑了(用定时器写了个LED 1s 闪烁的程序,但是 LED 也不闪了)。 但是如果过一定时间再发,好像就没有这个问题,很奇怪,难道要在某个地方加个延时吗?
SOEM 移植
接下来就是 SOEM 的移植工作了,看到一个挺不错的文章,甚至也是控制汇川的,先参考参考。 这篇帖子是用 RT-Thread 实现主站控制汇川电机,但没有开放源码,也能稍作参考。
移植列表 (osal.c)
- void osal_timer_start(osal_timert * self, uint32 timeout_us);
- boolean osal_timer_is_expired(osal_timert * self);
- int osal_usleep(uint32 usec);
- ec_timet osal_current_time(void);
- void osal_time_diff(ec_timet *start, ec_timet *end, ec_timet *diff);
- int osal_thread_create(void *thandle, int stacksize, void *func, void *param);
- int osal_thread_create_rt(void *thandle, int stacksize, void *func, void *param);
OK, osal.c 文件移植完成,接下来是 oshw 目录下的 nicdrv(NIC driver) 和 oshw(OS hardware)
oshw.c:
- uint16 oshw_htons(uint16 host);
- uint16 oshw_ntohs(uint16 network);
- ec_adaptert * oshw_find_adapters(void);
- void oshw_free_adapters(ec_adaptert * adapter);
nicdrv.c:
- void ec_setupheader(void *p);
- int ecx_setupnic(ecx_portt *port, const char * ifname, int secondary); //网口初始化并打开
- int ecx_closenic(ecx_portt *port); //网口关闭
- void ecx_setbufstat(ecx_portt *port, int idx, int bufstat); //设置idx号缓冲区状
- int ecx_getindex(ecx_portt *port); //获取空闲idx缓冲区号获取新的帧标识符索引并分配相应的缓冲区.
- int ecx_outframe(ecx_portt *port, int idx, int stacknumber); //发送数据
- int ecx_outframe_red(ecx_portt *port, int idx); //通过次口发送数据
- int ecx_waitinframe(ecx_portt *port, int idx, int timeout); //等待idx号返回并接收 接收数据函数
- int ecx_srconfirm(ecx_portt *port, int idx,int timeout); //发送idx 并等待接收数据的函数
en… 偶然间看到这个:
// ethercattype.h
// ...

/** define EC_VER1 if version 1 default context and functions are needed
 * comment if application uses only ecx_ functions and own context */
#define EC_VER1
以及这一段:
// nicdrv.h
// ...
#ifdef EC_VER1
extern ecx_portt     ecx_port;
extern ecx_redportt  ecx_redport;

int ec_setupnic(const char * ifname, int secondary);
int ec_closenic(void);
void ec_setbufstat(int idx, int bufstat);
int ec_getindex(void);
int ec_outframe(int idx, int stacknumber);
int ec_outframe_red(int idx);
int ec_waitinframe(int idx, int timeout);
int ec_srconfirm(int idx,int timeout);
#endif
那我果断注释掉,又可以少移植一部分。还有我发现其实这两个模块的代码貌似在主要模块 soem 中也不怎么用到,原来还以为是主模块依赖这两个模块,所以统一接口方便移植呢,现在看来,嗯……不太懂了
硬件初始化问题
在测试 ETH 模块时又遇到一个很奇怪的问题,就是下面这段代码,本应该是会 Start ETH 模块才对,但调试了几次,感觉它根本就没有进到这一步, 而且是单步执行的时候,可以正常运行,但直接连续运行的时候就不行。
void ETH_StartLink(void)
{
  ETH_MACConfigTypeDef MACConf = {0};
  int32_t PHYLinkState = 0U;
  uint32_t linkchanged = 0U, speed = 0U, duplex =0U;
  PHYLinkState = LAN8720_GetLinkState(&lan8720);
  if(PHYLinkState <= LAN8720_STATUS_LINK_DOWN)
  {
    HAL_ETH_Stop(&heth);
  }
  else if(PHYLinkState > LAN8720_STATUS_LINK_DOWN)
  {
    switch (PHYLinkState)
    {
    case LAN8720_STATUS_100MBITS_FULLDUPLEX:
      duplex = ETH_FULLDUPLEX_MODE;
      speed = ETH_SPEED_100M;
      linkchanged = 1;
      break;
    case LAN8720_STATUS_100MBITS_HALFDUPLEX:
      duplex = ETH_HALFDUPLEX_MODE;
      speed = ETH_SPEED_100M;
      linkchanged = 1;
      break;
    case LAN8720_STATUS_10MBITS_FULLDUPLEX:
      duplex = ETH_FULLDUPLEX_MODE;
      speed = ETH_SPEED_10M;
      linkchanged = 1;
      break;
    case LAN8720_STATUS_10MBITS_HALFDUPLEX:
      duplex = ETH_HALFDUPLEX_MODE;
      speed = ETH_SPEED_10M;
      linkchanged = 1;
      break;
    default:
      break;
    }
    if(linkchanged)
    {
      HAL_ETH_GetMACConfig(&heth, &MACConf);
      MACConf.DuplexMode = duplex;
      MACConf.Speed = speed;
      MACConf.DropTCPIPChecksumErrorPacket = DISABLE;
      MACConf.ForwardRxUndersizedGoodPacket = ENABLE;
      HAL_ETH_SetMACConfig(&heth, &MACConf);
      HAL_ETH_Start_IT(&heth);
      }
  }
}
这时我也想到是某个地方可能需要等待一下初始化之类的,但就是没找到。
在数次尝试后,才想起来给 PHYLinkState <= LAN8720_STATUS_LINK_DOWN 这个判断里面打个断点。
果然就是连续运行就会进到这一步,单步执行就会执行下面的正常的 Start 代码。
那看来是 PHY 外设的初始化需要一点时间。那接下来就是看看 LAN8720 的数据手册看看能不能加点判断,或者加一个延时暴力解决吧。
简单查找,发现 PHY SPECIAL CONTROL/STATUS REGISTER 寄存器中有这样一位:
Autodone: bit 12
Auto-negotiation done indication:
0 = Auto-negotiation is not done or disabled (or not active)
1 = Auto-negotiation is done
那么就通过一个 while 循环判断这一位的值来确保 auto-negotiation 的完成吧:
do {
pObj->IO.ReadReg(addr, LAN8720_PHYSCSR, ®value);
} while((regvalue & LAN8720_PHYSCSR_AUTONEGO_DONE) != LAN8720_PHYSCSR_AUTONEGO_DONE); // 等待 auto-negotiation 完成结合 FreeRTOS 与 ETH
现在遇到一个很难搞的问题,一个 ETH 测试程序跑得好好的,但一加上 FreeRTOS 的模块就出问题了,不知道怎么搞啊。
经过不断地观察,发现使用 LwIP 与 FreeRTOS 的示例里,MX_LWIP_Init() 这个初始化函数是在线程里面的,但是我的 ETH 测试程序里,MX_ETH_Init() 是在 main 函数里,
os 初始化和开始之前的。于是试着将这个函数的调用移到 default 线程中……然后就可以了。但是,这到底是为什么呢?难道说 RTOS 的初始化和开始的过程会对 ETH 或者 DMA 模块有影响吗?
还是说,是内存地址的原因呢。RTOS 确实是会对内存进行管理的。
接着就还有一个问题,就是在 free 内存的时候会报错。
void HAL_ETH_RxCpltCallback(ETH_HandleTypeDef * heth)
{
	ETH_BufferTypeDef * pBuff;
	HAL_StatusTypeDef status;
	status = HAL_ETH_ReadData(heth, (void**)&pBuff);
	if (status != HAL_OK) {
		Error_Handler();
	}
	printf("Packet Received successfully!\r\n");
	printf("Received length: %lu", pBuff->len);
	fflush(0);
	free(pBuff); // 就是这里有问题
}
下面是对应的分配内存代码:
void HAL_ETH_RxAllocateCallback(uint8_t ** buff) {
 ETH_BufferTypeDef * p = malloc(100);
 if (p)
 {
   * buff = (uint8_t * ) p + offsetof(ETH_AppBuff, buffer);
   p -> next = NULL;
   p -> len = 100;
 } else {
   * buff = NULL;
 }
}
这个问题的话,就试试用 RTOS 提供的内存管理处理一下吧。首先在线程中, ETH 初始化前初始化一个内存池子。
rxBufferPool = osMemoryPoolNew(ETH_RXBUFNB, ETH_RX_BUF_SIZE, NULL);
assert_param(rxBufferPool != NULL);
接着修改分配内存的代码:
void HAL_ETH_RxAllocateCallback(uint8_t ** buff) {
	ETH_AppBuff * pAppBuff = osMemoryPoolAlloc(rxBufferPool, 1000);  // 这里使用了 os 的线程安全内存分配方法
	if (pAppBuff) {
		ETH_BufferTypeDef * p = &(pAppBuff->AppBuff);
		*buff = pAppBuff->buffer;
		p->next = NULL;
		p->len = 0;  // 初始大小设为 0
		p->buffer = *buff; // buffer 指针指向实际 buff 位置
	} else {
		*buff = NULL;
	}
}
然后是接收到数据时的回调函数:
void HAL_ETH_RxCpltCallback(ETH_HandleTypeDef * heth)
{
	ETH_BufferTypeDef * pBuff;
	HAL_StatusTypeDef status;
	status = HAL_ETH_ReadData(heth, (void**)&pBuff);
	if (status != HAL_OK) {
		Error_Handler();
	}
	printf("Packet Received successfully!\r\n");
	printf("Received length: %lu", pBuff->len);
	osMemoryPoolFree(rxBufferPool, pBuff);  // 这边修改为使用 os 的释放方法
	fflush(0);
}
将开发板和电脑用网线连接,然后配置一下 IP, 就能使用 Wireshark 抓取到板子发送的 packet 了:


至此就成功应用了 FreeRTOS 并实现了 ETH 的基本功能。
成为 Vscode 少女吧
终于,我受不了那个鬼 CubeIDE 了,虽然大致还是功能齐全的,但是是不是就卡死要重启,而且更个新还更坏了,用不了了,真是垃圾 eclipse。于是果断改用 vscode, 其实官方也已经有了个叫 STM32 VS Code Extension 的拓展,只要按照 user guide 上的做就能顺利迁移了。真是悔不当初啊。不过用这个插件有一个限制,就是它只有 st-link 的选项, 如果用 J-Link 或其它下载器不知道能不能用。
主要的操作就是把一些之前的 IDE 相关的文件删掉,一般只用保留 Driver, Core, Middlewares, *.ioc, .mxproject 这几个文件/目录就可以了。然后用 CubeMX 打开 .ioc 文件,
IDE 那里选择 Cmake, 然后重新生成代码。在拓展里有一个 import Cmake project 的选项,使用它选择该目录,拓展就会生成一些 .vscode 的文件,这样就实现可以自动补全之类的功能啦!
接着如果项目有一些自己添加的源文件和 include 的路径需要在 CmakeLists.txt 里面对应地添加。如下面这样:
# 通过 file 命令匹配多个文件
file(GLOB SOEM_SOURCES "Middlewares/Ethercat/osal/*.c" "Middlewares/Ethercat/oshw/*.c" "Middlewares/Ethercat/soem/*.c")
# Add sources to executable
target_sources(${CMAKE_PROJECT_NAME} PRIVATE
    # Add user sources here
    ${SOEM_SOURCES} # 添加匹配的文件
    "Core/Src/oled.c" # 直接添加源文件
    "Core/Src/key.c"
    "Core/Src/lan8720.c"
    "Core/Src/SV630N.c"
)

# Add include paths
target_include_directories(${CMAKE_PROJECT_NAME} PRIVATE
    # Add user defined include paths
    "Middlewares/Ethercat/osal" # 添加包含路径
    "Middlewares/Ethercat/oshw"
    "Middlewares/Ethercat/soem"
)
这样之后点击生成应该就可以开始 build 流程了。
如果配置 Cmake 的时候提示缺少 Ninja 的话,需要再安装一个 ninja build tool
点击上面的链接,进入 Release 页面,下载对应系统架构的版本,解压文件到一个目录,并把该目录添加进环境变量的 Path 里面(为安全着想,这个目录最好没有其它文件)
build 完之后,在侧边栏找到运行与调试,选择 Build & Debug...,然后点开始调试,就会开始下载程序并调试了(记得把线连上)。如果它提示需要更新 st-link firmware 那就在扩展里点相应的选项即可。如果报错,那就在命令行敲 stlinkupgrade(记得把线连上)。
接着就可以在 vscode 里愉快地敲代码啦。
注意 ISR 与 RTOS 的配合
Debug 途中,遇到一个问题,貌似网络接收不太正常,找了一圈发现是 RxAllocCallback() 函数中使用内存池进行内存分配时出现了问题,
代码如下:
ETH_AppBuff* appBuff = osMemoryPoolAlloc(rxMemoryPool, 1000);调试时发现,这个函数调用前 4 次都正常,但后面就返回 NULL 了,而内存池显然是还有空间的。进入这个函数的源码内看,发现原来是在 ISR 中,
它要求 timeout == 0,倒也合情合理。而这个回调函数的前4次是在 HAL_ETH_Start_IT() 中调用的,后面的就是在中断中调用了,所以就出问题了。
为解决这个问题,我干脆新建两个 ETH 发送和接收的线程,rx 中断仅仅用于释放信号量,线程中则永久等待信号量,这样简化了 ISR,也不要在 ISR 中处理这么多事情了。
写完,实测,能跑,不错。
汇川进入 OP 状态时出错
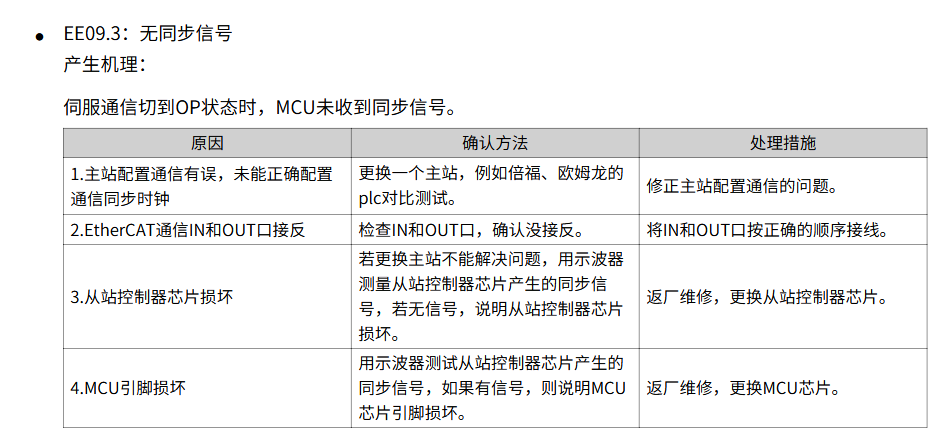
现在有个棘手的问题,就是汇川驱动器 SV630N,在接收到进入 OP 运行状态的请求时,就会报错 EE09.3, 看文档的话,说的是同步丢失的问题, 上网找了一圈也都试过各种方法都不太行。不知道要怎么办了。
在网上寻找的时候发现 SOEM Github 上的一个issue,他说可以检查一下 Register System Time Difference (0x092C:0x092F),它的值最好是小于 1ms,若满足要求则可以开始 sync0/1 信号的生成。
The best way to make sure all slave clocks are locked in is to measure the internal closed loop parameters. Register System Time Difference (0x092C:0x092F) is the obvious one to test. When it’s value drops below one microsecond and stays below it then you have reached reasonable synchronization. It is the task of the application programmer (and not SOEM) to monitor this for all slaves. Only when this constraint is satisfied try to start the sync0/1 generation.
有可能要在
Keep in mind that some slaves will take up to 10 seconds or more to measure. Forcing safe-OP to OP before that will cause the slave to fail.
接着提出 issue 的人指出可以尝试在 config mapping 之前配置 DC clock,但我的代码就是这样的呀。
Thank you so much Arthur. Finally after reading your message and many old issues as well I realized that it’s better to configure de DC clock before mapping the slaves (in Pre-OP). I was first mapping the slaves and then configuring the DC clock (I think that I took it from an example). So right now the slaves go to OP without no error at the first attempt!
The thing is when you call ec_dcsync0() before ec_configdc() that the latter will overwrite the slave reference clock. If the first sync0 did not trigger before that then it most likely will not trigger for a long time. The reason is that the first sync0 will fire at an absolute time (64bit). So make sure this absolute time is always a bit in the future.
在另一篇 issue 中,开发者说明了可能需要在 safe-op 状态下跑一段时间,确认了满足条件后再请求进入 OP 状态,以让驱动器有足够的时间确认 DC 时钟。
The correct timing to start sync0 generation is AFTER slave AND master clock synchronization, but BEFORE going to OP. And, to be sure the slave has time to validate proper master and sync0 timing, wait a few seconds before going to OP. ec_configdc() should be called at pre-OP. Then run the 10.000 cycles, then sync the master clock. There are a few weird slaves out there that require to set-up sync0 on the transition from pre-OP to safe-OP. This is violating the EtherCAT protocol specification but what can you do? It is like “I was programmed without understanding the standards and only tested with TwinCAT and now I am confused and going to crash”.
然后下面是 issue 作者整理的一份执行顺序
Okay so the order should be:
- Call ec_config_init() to move from INIT to PRE-OP state.
- Do slave-specific configurations via SDO communication
- Set ecx_context.manualstatechange = 1. Map PDOs for all slaves by calling ec_config_map().
- Call ec_configdc() in PRE-OP state
- Manually call the transition to SAFE-OP (some slaves require starting sync0 here, but this is a violation of the EtherCAT protocol spec so it is not the default)
- Do 10,000 process data cycles in SAFE-OP state
- Synchronise the slave and master clock by setting the master clock = slave reference clock
- Call ec_dcsync0() for the reference clock slave
- Wait for a few seconds
- Transition to OP state
我觉得可以先试试。
嗯……试了也不行呐……